Hydration Pack Care: Cleaning and Maintaining Hydration Packs
Key Point Summary of Cleaning and Maintaining Hydration Packs:
- Effective Cleaning Techniques: Learn how to keep your hydration pack in top condition with simple, yet effective cleaning methods.
- Regular Maintenance Tips: Discover essential maintenance tips to prolong the life of your hydration pack.
- Gear Care Best Practices: Understand the best practices for gear care, specifically tailored for hydration packs used in cycling.
As a master cyclist who has spent years racing and riding across various terrains – from rugged mountain trails to winding gravel paths and the demanding circuits of cyclocross – I’ve learned the crucial role that hydration packs play in every cyclist’s journey. Whether you’re a beginner hitting the trails for the first time or a mid-level enthusiast looking to up your game, understanding how to care for your hydration pack is essential. In this guide, I’ll walk you through everything you need to know about cleaning, maintaining, and caring for your hydration pack, drawing from my own experiences and mishaps along the way.
Effective Cleaning Techniques
After Every Use: Rinse and Dry Remember that time I finished a grueling cyclocross race only to find my hydration pack tainted with the taste of stale water the next week? That’s when I realized the importance of rinsing out the bladder after every use. Simply fill it with warm water, shake it well, and drain. Make sure to dry it completely by hanging it upside down. I’ve even rigged a homemade drying rack using coat hangers!
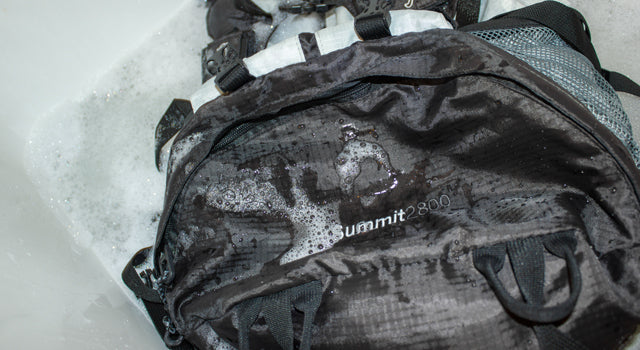
Deep Cleaning: Disinfecting the Bladder Once a month or after a particularly muddy ride, deep cleaning is a must. Mix a solution of baking soda and warm water, and fill the bladder. Let it sit for an hour, then rinse thoroughly. For tougher mold or mildew, a solution of two tablespoons of bleach in a liter of water works wonders. Just remember to rinse it very well afterward to avoid any bleach residue.
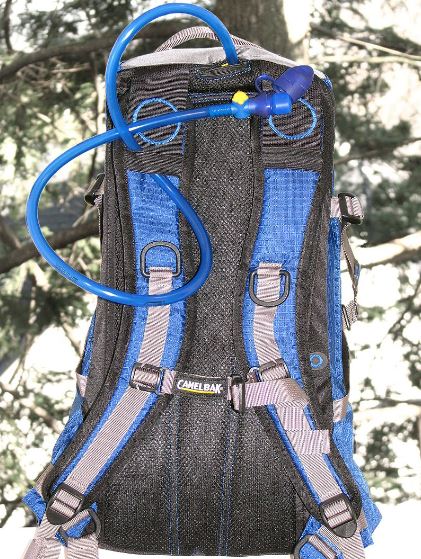
Cleaning the Hose and Bite Valve The hose and bite valve can be breeding grounds for bacteria. I detach mine and soak them in a mild bleach solution for about 30 minutes. A thin brush or a long piece of string with a rag attached can be used to clean the inside of the hose. Rinse everything thoroughly afterward.
Regular Maintenance Tips
Check for Leaks Regularly Leaks can ruin your ride and damage other gear. I learned this the hard way on a long mountain bike ride when my spare inner tube got soaked! Regularly inspect your hydration pack for any signs of wear and tear, especially around the hose connections and the bladder itself.
Lubricate the Bite Valve To keep the bite valve functioning smoothly and to prevent it from drying out and cracking, lubricate it occasionally with food-grade silicone. This simple tip has saved me from struggling with a non-responsive valve mid-ride more than once.
Store It Properly When not in use, store your hydration pack in a cool, dry place. I hang mine with the bladder open to prevent any mildew or mold from forming. Avoid storing it in direct sunlight or in damp places, as this can degrade the materials over time.
Gear Care Best Practices
Use Only Approved Liquids It’s tempting to fill your hydration pack with sports drinks, but I advise against it. These can leave a sticky residue and encourage bacterial growth. Stick to water, and if you need electrolytes, carry them separately.
Regularly Replace Parts The parts of a hydration pack, like the hose and bite valve, can wear out over time. Replacing them regularly ensures your pack functions optimally and remains hygienic. I keep a small stock of replacement parts handy, just in case.
Be Mindful of Pack Weight As cyclists, we’re always looking to shed unnecessary weight. A full hydration pack can be heavy, so only carry as much water as you’ll realistically need. This not only makes your ride more comfortable but also reduces the strain on the pack’s materials.
Best Reservoir Cleaning Tablets for Hydration Systems
When it comes to maintaining your hydration reservoir, using cleaning tablets is an effective and convenient method. Here are some of the best reservoir cleaning tablets available, known for their efficacy in cleaning and keeping the reservoirs free from taste and odor:
- CamelBak Cleaning Tablets: Specifically designed for CamelBak reservoirs, these tablets are easy to use and highly effective in keeping the reservoir clean. They are biodegradable and safe, ensuring that no harmful residues are left behind.
- Aquatabs: Although primarily a water purification tablet, Aquatabs can also be used for cleaning hydration systems. They are effective in killing bacteria and viruses and are safe for use in drinking water systems.
- Katadyn Micropur Purification Tablets: These tablets not only clean but also purify the water, making them a dual-purpose option. They are ideal for outdoor enthusiasts who might need to refill their reservoirs from natural water sources.
- Bottle Bright Tablets: These environmentally safe tablets are designed for cleaning not just hydration reservoirs but also water bottles, coffee thermoses, and other containers. They are biodegradable, chlorine-free, and leave no harsh chemicals behind.
- Hydrapak Bottle Bright: Made by Hydrapak, these tablets are specifically formulated to clean all hydration reservoirs effectively. They remove stubborn stains and odors, ensuring your hydration pack remains fresh and clean.
When using any cleaning tablet, make sure to follow the manufacturer’s instructions. Typically, you’ll fill the reservoir with water, add a tablet, and let it dissolve for a specified time before rinsing thoroughly. Regular use of these tablets can help maintain the cleanliness of your hydration pack and prolong its life.
FAQ
How often should you clean a hydration pack?
The frequency of cleaning a hydration pack depends on how often and in what conditions it’s used. Here are some general guidelines:
- Rinse After Every Use: It’s good practice to rinse out the bladder with warm water after every use, especially if you’ve been out on a long or particularly strenuous ride. This helps prevent the buildup of bacteria and mold.
- Regular Cleaning: If you’re using the pack frequently, a more thorough cleaning is recommended at least once every two weeks. If you use it less frequently, a monthly deep clean should suffice.
- Deep Cleaning: Perform a deep clean every few months, or more frequently if you notice any mold or unpleasant tastes/odors. This involves using a cleaning solution (like a mix of baking soda and water, or a specialized cleaning tablet) to thoroughly clean the bladder, hose, and bite valve.
- After Storing for a Long Period: If your hydration pack has been stored for a while, it’s a good idea to give it a thorough cleaning before using it again, even if it was clean when you stored it.
- Post-Usage in Harsh Conditions: If you’ve been cycling in muddy or dusty conditions, or if the hydration pack has been exposed to liquids other than water (like sports drinks), a deep clean immediately after use is recommended to avoid any long-term damage or contamination.
How do you keep mold out of a hydration pack?
Preventing mold growth in a hydration pack requires a combination of regular cleaning, thorough drying, and proper storage. Here are some effective strategies to keep mold at bay:
- Dry Thoroughly After Each Use: After cleaning or rinsing your hydration pack, ensure it is completely dry before storing. Mold thrives in moist environments, so eliminating any residual moisture is key. Leave the bladder open and hang it upside down in a well-ventilated area. For the hose, you can use a specialized dryer or hang it so that air can flow through it.
- Use Cleaning Agents Regularly: Regular cleaning with appropriate agents can prevent mold growth. This can include mild soap, baking soda, or specialized cleaning tablets. After using these agents, make sure to rinse the components thoroughly to remove any soap residue.
- Deep Clean Periodically: Even with regular rinsing, it’s important to perform a deep clean periodically. For more thorough cleaning, you can use a diluted bleach solution (a small amount of bleach in a large volume of water), but ensure to rinse thoroughly afterward. Vinegar is a natural alternative that can also be effective.
- Store in a Dry, Cool Place: When not in use, store your hydration pack in a dry, cool environment. Avoid places with high humidity which can promote mold growth.
- Keep It Empty When Stored: Store the hydration pack empty. Storing it with water inside, even clean water, can lead to mold growth.
- Inspect Regularly: Regularly check for any signs of mold. Early detection can prevent it from becoming a bigger problem. Pay special attention to hard-to-see areas like the inside of the bladder, the hose, and the bite valve.
- Use Anti-Microbial Options: Some hydration packs come with anti-microbial treatments that help prevent mold and bacteria growth. If you’re in the market for a new hydration pack, consider one with this feature.
- Avoid Sugary Liquids: Stick to water. Using sports drinks or flavored liquids can leave sugars and residues that promote mold growth. If you do use such liquids, a thorough cleaning immediately after use is essential.
How do you Sterilise a hydration pack?
Sterilizing a hydration pack is crucial for maintaining its hygiene and ensuring the water you drink from it is safe. Here’s a step-by-step guide to effectively sterilize your hydration pack:
- Empty the Pack: Start by emptying all the water from the bladder, hose, and bite valve.
- Prepare a Sterilizing Solution: You can use a mild bleach solution as a sterilizing agent. Mix about 2-5 ml (about a teaspoon) of unscented household bleach with 1 liter of water. If you prefer a non-chemical option, you can use a solution of white vinegar and water (equal parts).
- Fill the Bladder: Pour the sterilizing solution into the bladder. Make sure the solution is enough to fill the bladder.
- Run Solution Through the Hose and Bite Valve: Pinch the bite valve to allow the sterilizing solution to run through the hose and out of the valve. This ensures that the entire system, including the hose and bite valve, gets sterilized.
- Let it Sit: Leave the solution in the bladder, hose, and bite valve for about 30 minutes. This duration allows the solution to effectively kill any bacteria or mold present.
- Rinse Thoroughly: After the waiting period, empty the sterilizing solution and rinse the bladder, hose, and bite valve several times with clean, cool water to ensure no bleach or vinegar residue remains. It’s crucial to rinse thoroughly because any residue of the sterilizing agent can affect the taste of the water and may not be safe to ingest.
- Dry Completely: After rinsing, hang the bladder, hose, and bite valve up to dry completely. Ensure that all parts are fully air-dried to prevent any mold or bacteria from forming. You can hang the bladder upside down and keep the cap off to allow air circulation.
- Inspect and Store: Once everything is dry, inspect the hydration pack for any signs of damage or remaining residue. Store it in a cool, dry place, preferably with the bladder open to allow air to circulate.
While sterilization is important, it’s not necessary to do it after every use unless the pack was used for liquids other than water, or if it hasn’t been used in a long time. Regular cleaning and drying after each use are typically sufficient for maintaining hygiene.
Incorporating these cleaning and maintenance practices into your routine will ensure your hydration pack stays in great condition, enhancing your cycling experience. Remember, taking care of your gear is just as important as training your body, and regular maintenance not only extends the life of your hydration pack but also ensures it remains safe and pleasant to use.
To ensure you have the best experience on your gravel and mountain biking adventures, we’ve meticulously rated and ranked the Best Hydration Packs available on the market. Our comprehensive reviews and ratings are designed to provide you with a shortcut to finding the hydration pack that best suits your specific needs, whether you’re tackling rugged mountain trails or cruising along challenging gravel paths. Stay tuned for our expert recommendations to enhance your ride with the perfect hydration companion.
Happy cycling!
John